
Snowflake Integration with Mule: A Comprehensive Guide
What is Snowflake?
Snowflake’s Data Cloud is powered by an advanced data platform provided as Software-as-a-Service (SaaS). Snowflake enables data storage, processing, and analytic solutions that are faster, easier to use, and far more flexible than traditional offerings.
The Snowflake data platform is not built on any existing database technology or “big data” software platforms such as Hadoop. Instead, Snowflake combines a completely new SQL query engine with an innovative architecture natively designed for the cloud. To the user, Snowflake provides all of the functionality of an enterprise analytic database, along with many additional special features and unique capabilities.
Snowflake is a true SaaS offering. More specifically:
- There is no hardware (virtual or physical) to select, install, configure, or manage.
- There is virtually no software to install, configure, or manage.
- Ongoing maintenance, management, upgrades, and tuning are handled by Snowflake.
Snowflake runs completely on cloud infrastructure. All components of Snowflake’s service (other than optional command-line clients, drivers, and connectors), run in public cloud infrastructures. Snowflake uses virtual compute instances for its compute needs and storage service for persistent storage of data. Snowflake cannot be run on private cloud infrastructures (on-premises or hosted). Snowflake is not a packaged software offering that can be installed by a user. Snowflake manages all aspects of software installation and updates.
You can read more about Snowflake by going through the following link: docs.snowflake.com
Steps to setup SnowFlake Account
- Sign up using https://signup.snowflake.com/ for 30-day free trial.
- Once you sign up, you’ll get a mail notification with your username and SnowFlake instance host.
- Follow all the mentioned steps in the mail after which you’ll be able to see the dashboard like the one below:

- In order to create a new database, click on Databases and then click on create. Which will then open a prompt box like the one below:

- Once, Database is created successfully, you can grant certain privileges specific to role by clicking on the created database like below:

- Using above steps we can setup the SnowFlake instances and create database.
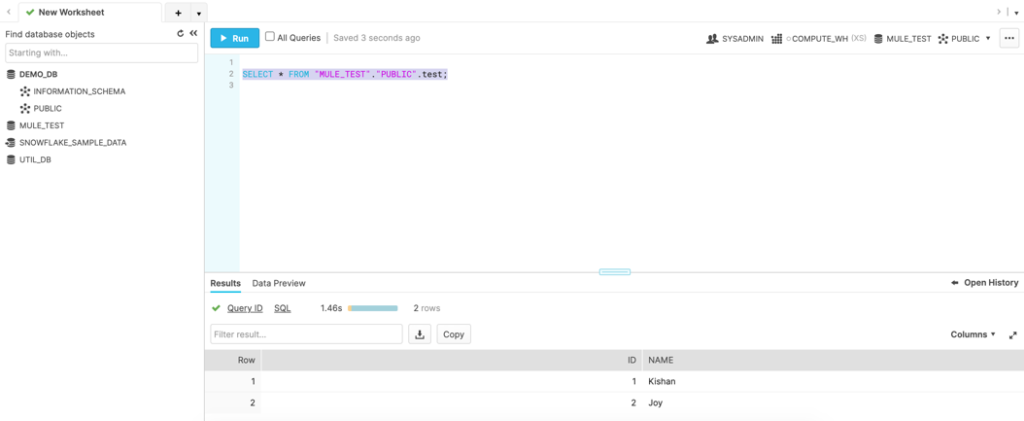
- We can use query sections to execute or run any query in order to create table or perform any operations on the same.
How to integrate SnowFlake With Mule?
- Create a new project in anypoint studio.
- Prepare the base structure using http listener.
- Update the pom.xml with <sharedLibrary> under maven plugins and <dependency> tags as below:
<sharedLibrary>
         <groupId>net.snowflake</groupId>
         <artifactId>snowflake-jdbc</artifactId>
</sharedLibrary>

<dependency>
        <groupId>net.snowflake</groupId>
        <artifactId>snowflake-jdbc</artifactId>
        <version>3.12.17</version>
</dependency>
- Add and configure the Database Config Global Element like below:
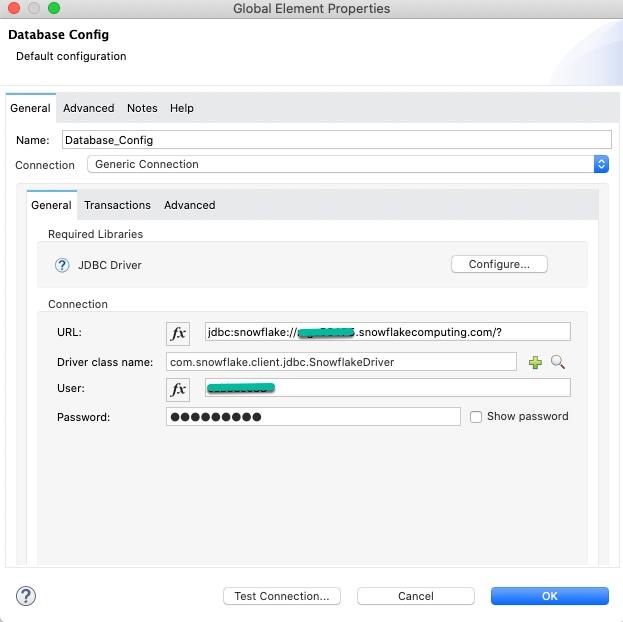
- Configure the latest Snowflake JDBC driver (https://repo1.maven.org/maven2/net/snowflake/snowflake-jdbc/)
- Now, do the mapping as per the requirement and operation within the flow, we have many operations available with the Mule Snowflake connector